For Zoey I used Simplicty pattern 2073 and New Look 6880. They're both the same company so merging the two to integrate the sleeves only required some minor adjustments. When I saw the costume pattern I totally fell in love with it, it was the boning in the skirt. I just love that poofy flared look and I knew it would really suit Zoey. After I bought the pattern I scoured the internet for hours and hours looking for the right fabric and it just wasn't out there. Finally days later I came up with a solution, sequins! I wanted it all to be as shiny and sparkly as possible because she was a princess too, not just strawberry shortcake. It took 4 tries to find the right color pink satin. Thankfully it was cheap at 3 dollars or less a yard. I glued on the sequins because it was less work that way but Ian has since ripped many of them off so I reinforced by sewing them on and gluing. It was not as easy as I thought it would be to arrange all those dots evenly on the dress because of the shape of the fabric I couldn't just measure and mark and have everything square. So it's not perfect, but at a glance I bet you can't tell many of them are off.
 |
| 2009 Version Strawberry Shortcake. She has a show on The Hub. |
Once the dress was all put together I just couldn't figure out the right head accessory. I kept coming back to a tiara for the princess effect but I couldn't figure out how to tailor it to what I wanted. As I was browsing around the internet for ideas I came across this Strawberry Fairy Hat and decided that style was the perfect accessory. So it kinda fits in the fairy category than princess, but I figured I was taking creative liberties on the Strawberry Shortcake character anyway I might as well do what I thought fit the style of the dress best. It took me three pattern drafts and mock up hats before I got the flare, ripple and crown all fitting and looking just right. The last thing left was to make the strawberry stem and leaves. That also took several drafts and tries to get it right. The green satin I bought was "costume" satin. Read: low quality and ravels easily. The rest of the satin for the dress was made with "special occasion" fabric, it was much more cooperative to sew with. With a butane lighter to melt the edges I was able to make it work. I decided to skip the glue for the hat and just sew all the sequins on.
The pattern did include tights but I decided to just purchase some from www.welovecolors.com. To let me have time to focus on Ian's costume. And so, I give you the Strawberry Shortcake Princess Fairy in all her glory!


I'm so happy with how her costume turned out that I'm entering it in two contests. One from Simplicity and one from We Love Colors. WLCs has a people's choice prize so head over to their page and Like Zoey's picture! The Simplicty contest is much more hard core, if you make the first cut you have to send them the costume for examination! I'd be really lucky to make the first cut, I'd be going up against some of the most talented sewers! Although, I did use a bit of creativity in altering the pattern and the inside of the dress is crazy neat thanks to my serger!
Totals for Zoey's Costume:
Pattern: $1
Fabric (3/4 yard pink, 1/2 yard white, 1/4 yard green): $4
Notions (thread, glue, sequins, zipper, boning, etc): $13
Tights: $9
Total: $27
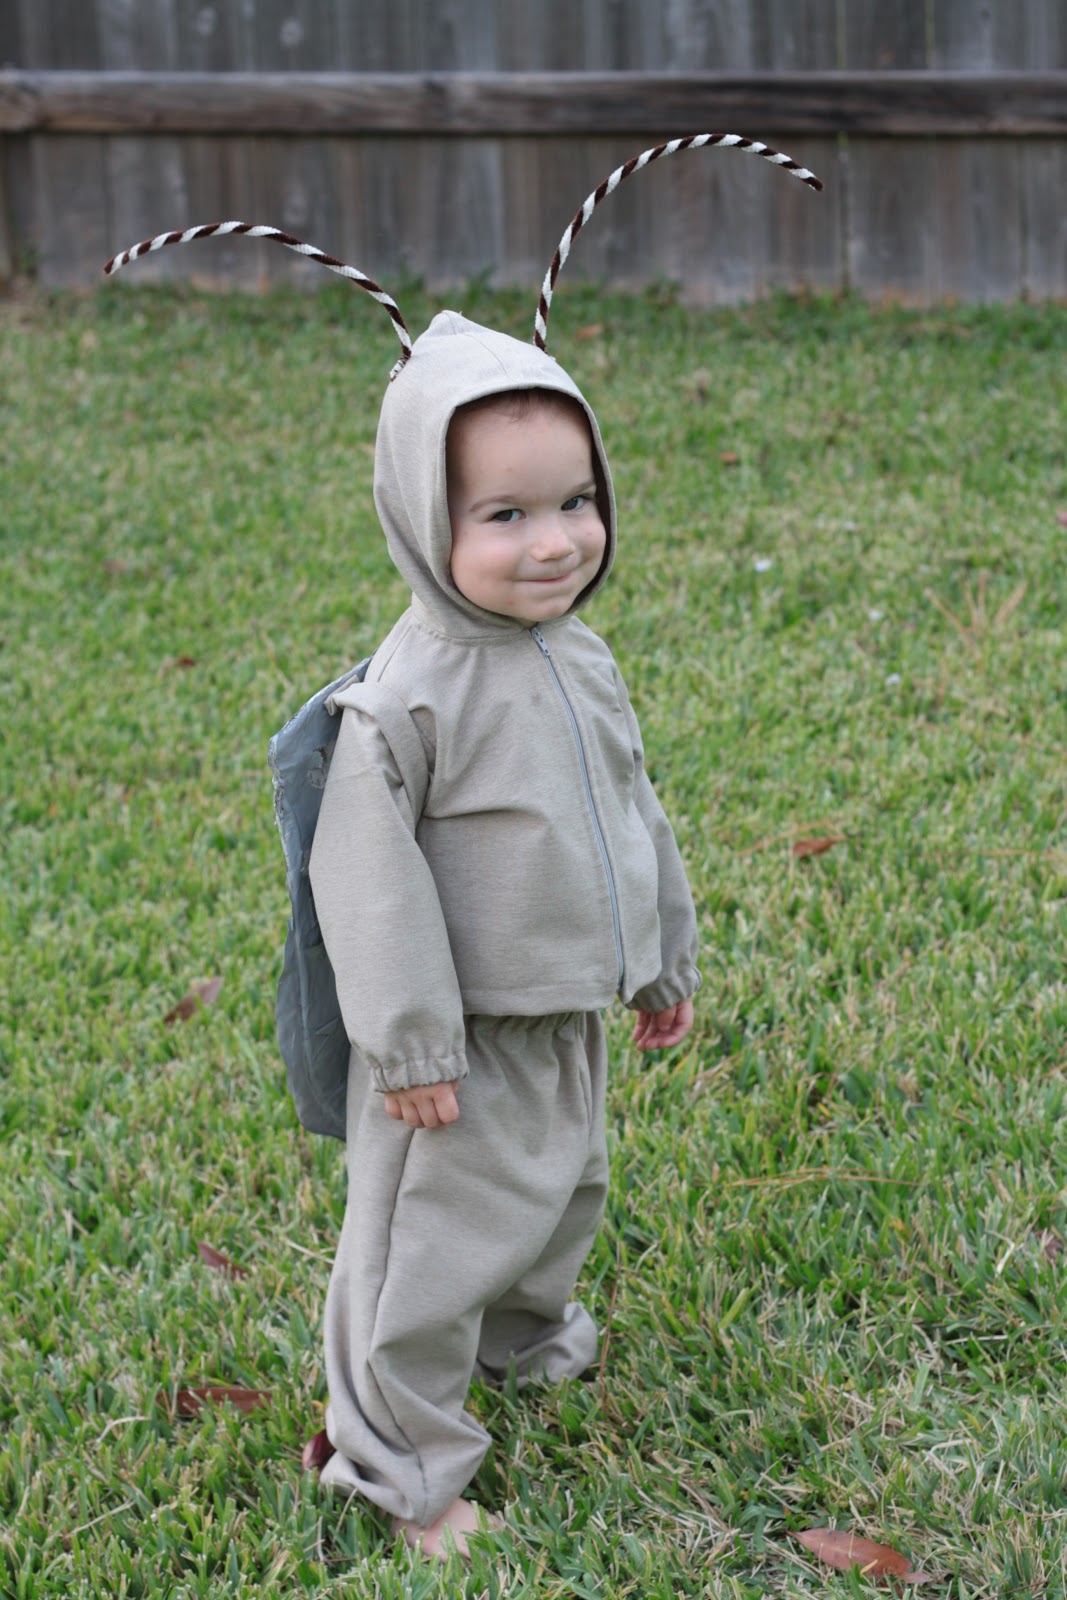
Now what about Ian? I call him Stink bug because 1. His poop stinks 2. He can't ever stay out of the garden, just like the stink bugs this summer wouldn't get out of my tomatoes! I decided to go with the Brown Marmorated Stink Bug because those were the variety eating up my plants and they seemed less boring looking than the green ones. I originally wanted to just go find a hoodie and pants for Ian's outfit but after much searching, I could not find anything I liked reasonably priced. Then I remembered some fabric I had that my mom had given me two years ago to use for Brandon's Jedi costume, but I wound up not using it then, glad I still had it, it was just right for Ian's costume!
I used Simplicty pattern 5316 without alterations (other than shortening the legs and cinching in the waist band because my kids are tiny). My first time putting in a separating zipper and I think it worked out pretty great. Then I just sewed some pipe cleaners to the hoodie for his antennae. I twisted two colors together that gave it just the right verigation. Though it is hard to tell the fabric is also sorta stripy in tan and cream. While in reality the bug's underside is more solid cream colored, it seemed to make more sense overall to have it just be brownish. The shell is where I dedicated the most work to Ian's costume. Yes, sewing the hoodie and pants took time, but only a couple hours overall. I spent that and more on the shell.
Since stink bugs don't really have very curved shells, I wanted it to be mostly flat but with some dimension. I glued together about 20 layers of newspaper on the hood of Brandon's car to get some slight curvature. I used this great paper mache paste recipe. I like it better than raw flour and water, it's smooth and seems to dry stronger. It's best used warm, once it cools it gets kinda chunky jelly like. I loved the way it came out but after searching more pictures, it needed way more dimension. I cut out a shield shape and then added another 10 layers of paper mache with some extra padding to bring it out more. It ended up rehydrating the bottom layers and they lost their shape. I guess it didn't really matter in the end.

I originally planned to paint the shell myself and I was really dreading this part. My artistic skills are basically nil when it comes to drawing, painting, coloring, or using any kind of medium in that range. After looking over lots and lots of pictures, the task seemed even more daunting because of all the variation in colors and pattern in the shell and wings. Then I had the great idea to blow up a picture of an actual stink bug and paper mache it to the form I made! Bingo! I found a high resolution picture, blew it up a little, shaped it to fit the shell I had made and paper mached it on. Perfection! I painted the back of the shell plan gray and then attached two straps I made from leftover fabric. I'm actually still struggling with this part, the straps work, but as long as Ian doesn't do anything toddler like, ie: run, fall, twist, or otherwise struggle in the thing or the straps break away from the paper mache. I've tried hot glue and heavy duty staples to keep the straps attached but it just isn't strong enough. I'm thinking I'll probably have to drill some holes and thread the straps in so it's holding to more than just the surface layer of paper.
I realize if I wanted to be proportionally correct the shell would have to be much much bigger, but he's a reluctant toddler as it is, I was lucky to get him to wear this much. Overall, I am very pleased. Ian makes a great stinkbug!

I'm going to enter Ian's costume in the Simplicity contest as well since I did use one of their patterns, but I doubt his will place since there is no real creativity in it on the sewing front.
Totals for Ian's costume:
Pattern: $5
Fabric: Free
Notions: $6
Shell: lets just say $1 in the cost of flour and paper, and glue, even though I got the newspapers free and I already had everything else.
Total: $12

1 comments:
Yep, that's a little stink bug if I ever saw one!
Just too cute too!
Post a Comment